Dive into the most challenging Hero Wars Adventures with detailed map guides, reward paths, and strategic insights. Whether you’re hunting for pet resources or optimizing your team runs, our step-by-step maps for Adventures will help you conquer every boss and claim every reward. Start your journey here!
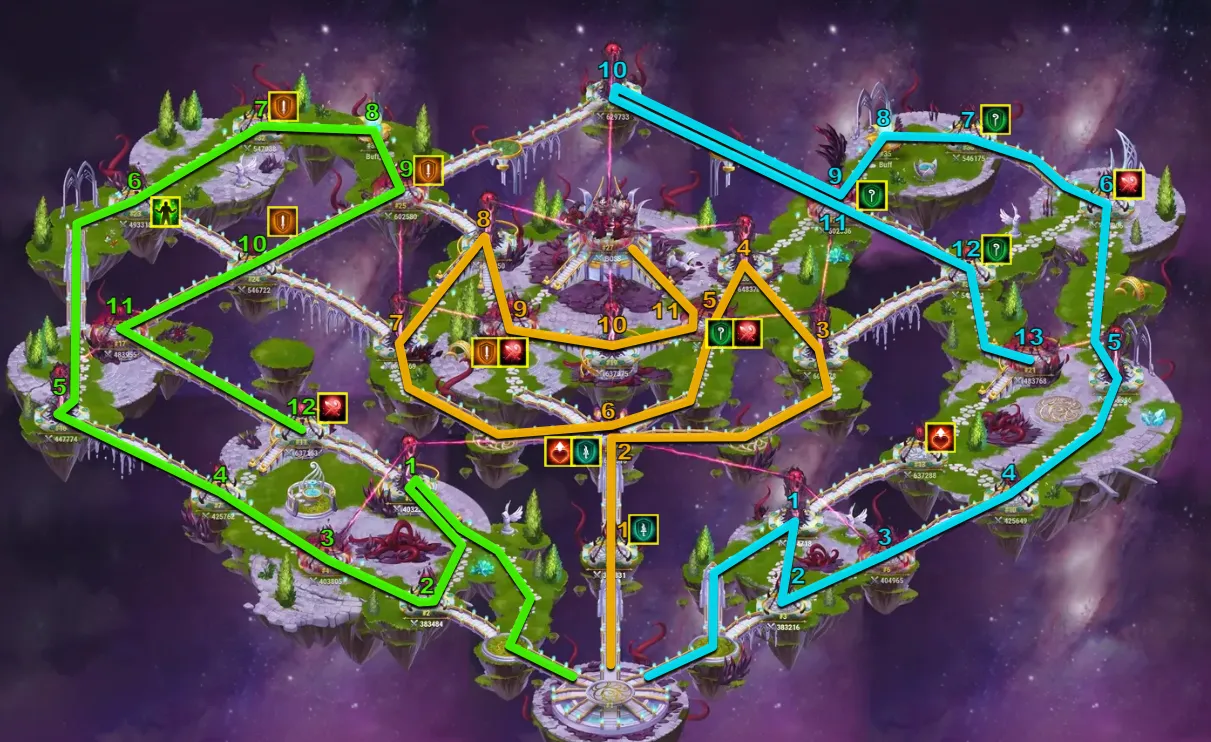
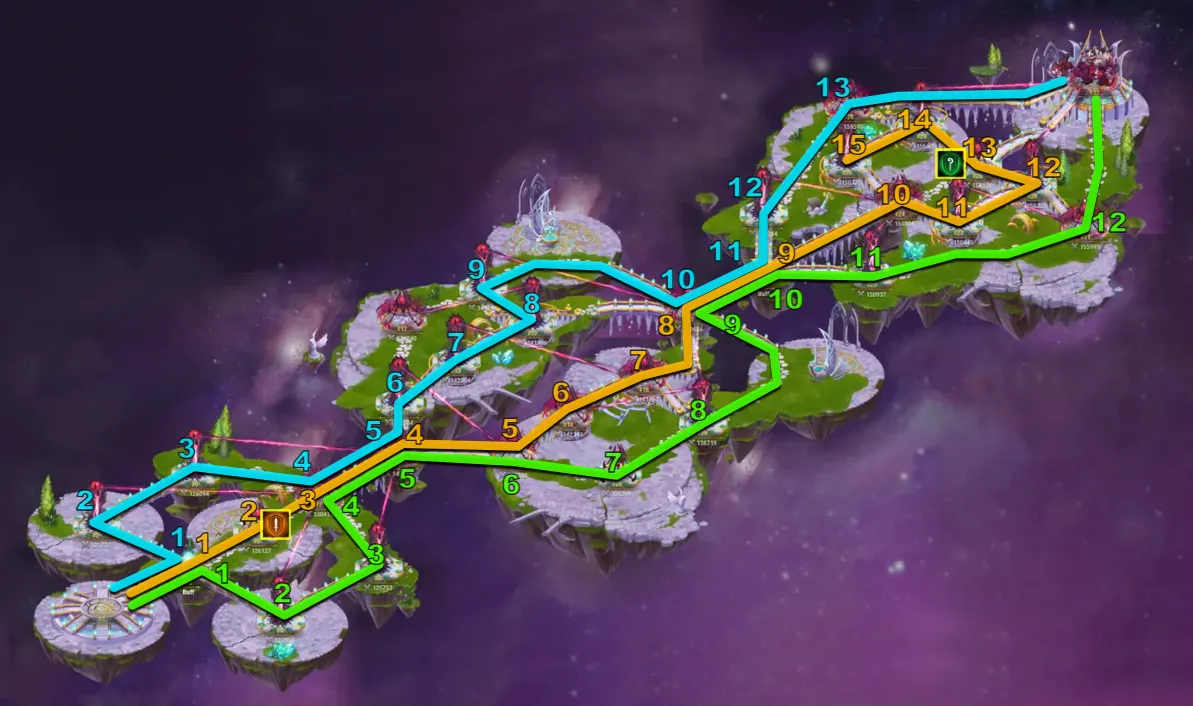
🗺️ Adventure Map 13
Adventure 13 throws you into a complex battlefield with multiple branching paths and powerful enemies guarding key objectives. Coordination is essential—players must split their efforts efficiently to activate altars and take down elite squads without losing time. Ideal for players with high-level pets and a solid understanding of team synergy, this map rewards precision and communication.
Highlights:
Multiple stronghold nodes that require synchronized attacks.
High pet soul stone and artifact rewards.
Best tackled with guildmates who understand advanced strategy.
Adventure Map 13
This adventure map changes daily and incorporates elements from other maps. Please check the current daily map in the game.
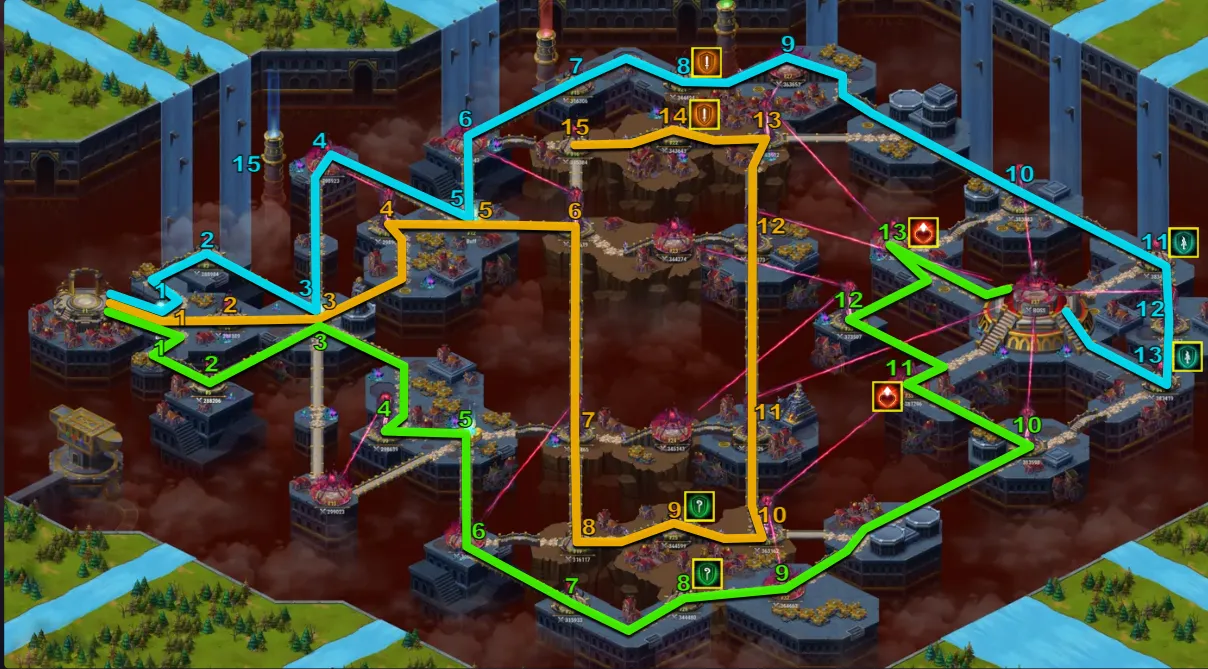
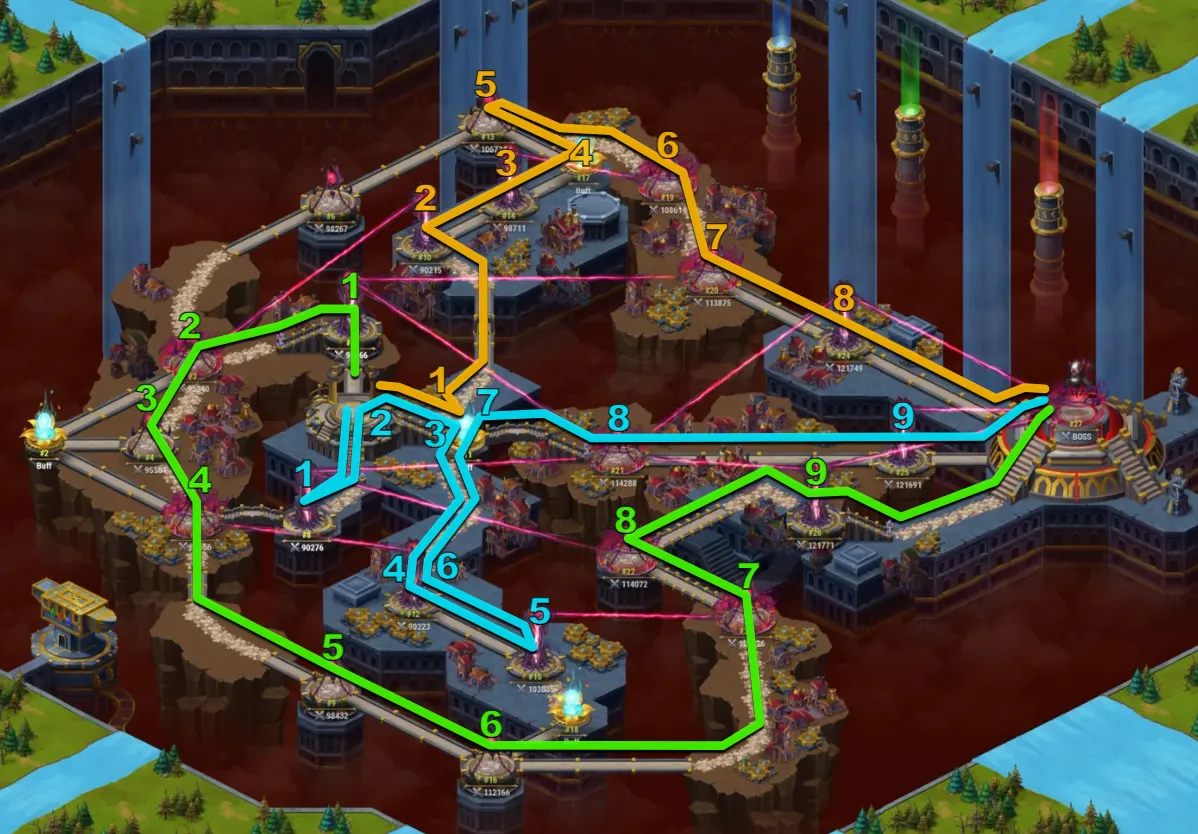
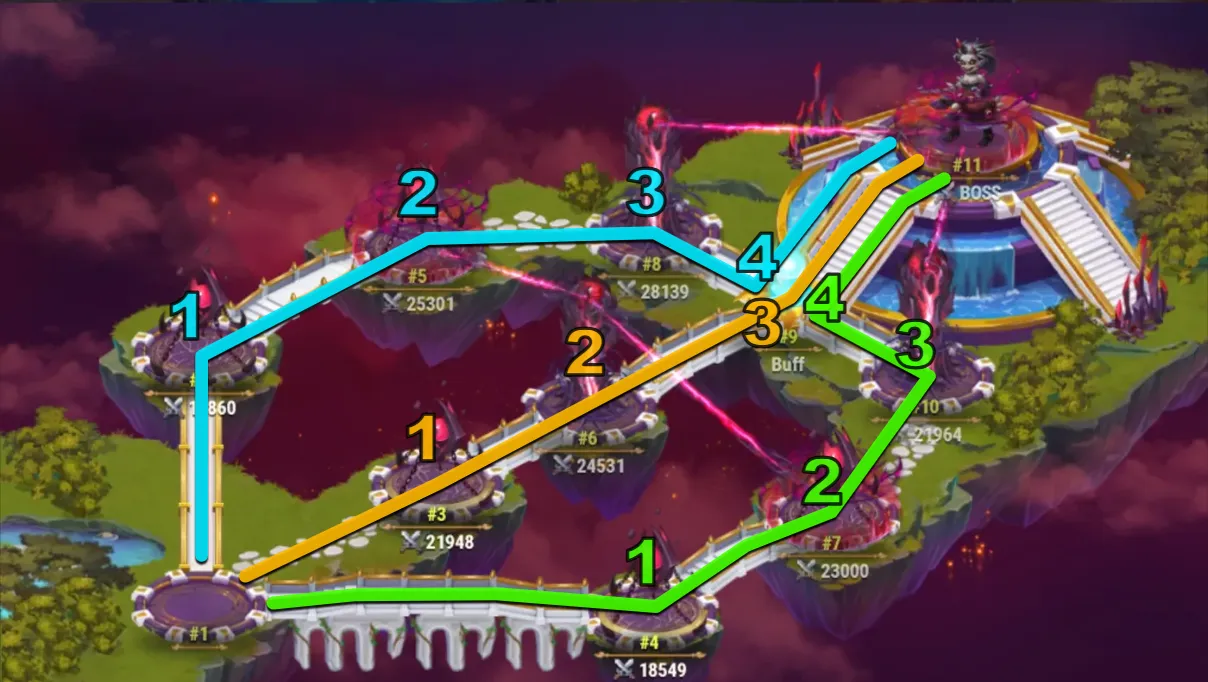
🗺️ Adventure Map 12 – Blind Justice
In Adventure 12, players are faced with deceptive shortcuts, ambush squads, and power altars hidden deep within enemy lines. One misstep can force a restart, so route planning is critical. The map emphasizes both exploration and calculated risk-taking, perfect for experienced adventurers.
Highlights:
Path splitting early on – plan who goes where!
Time-limited nodes that disappear if ignored.
Generous drops of Pet Potions and Chaos Particles.
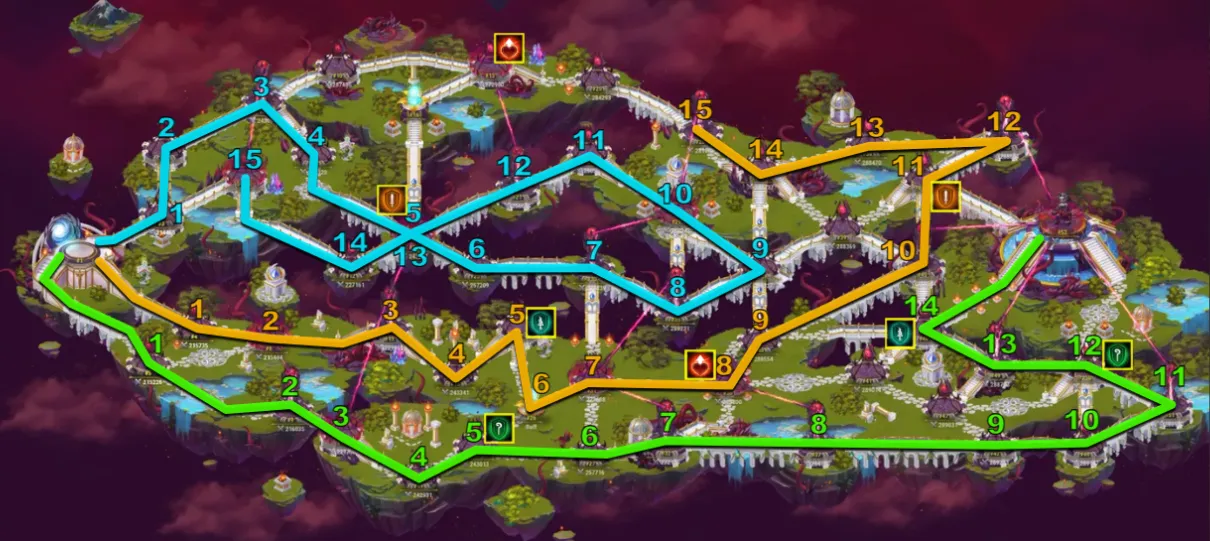
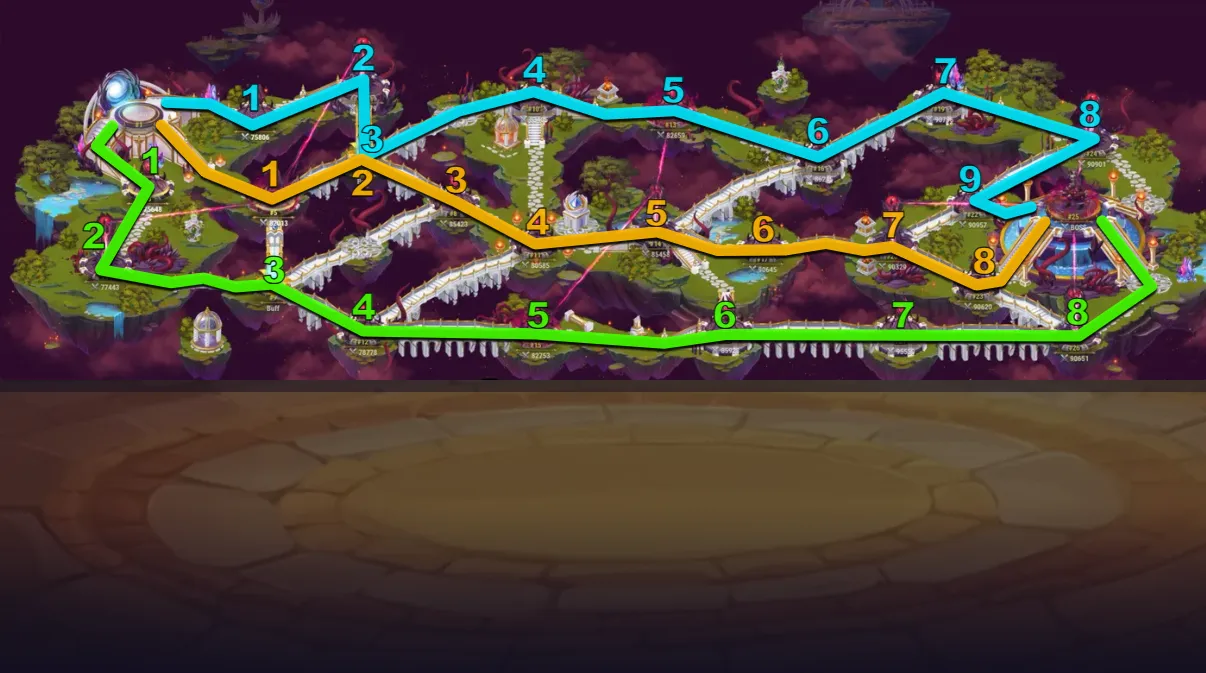
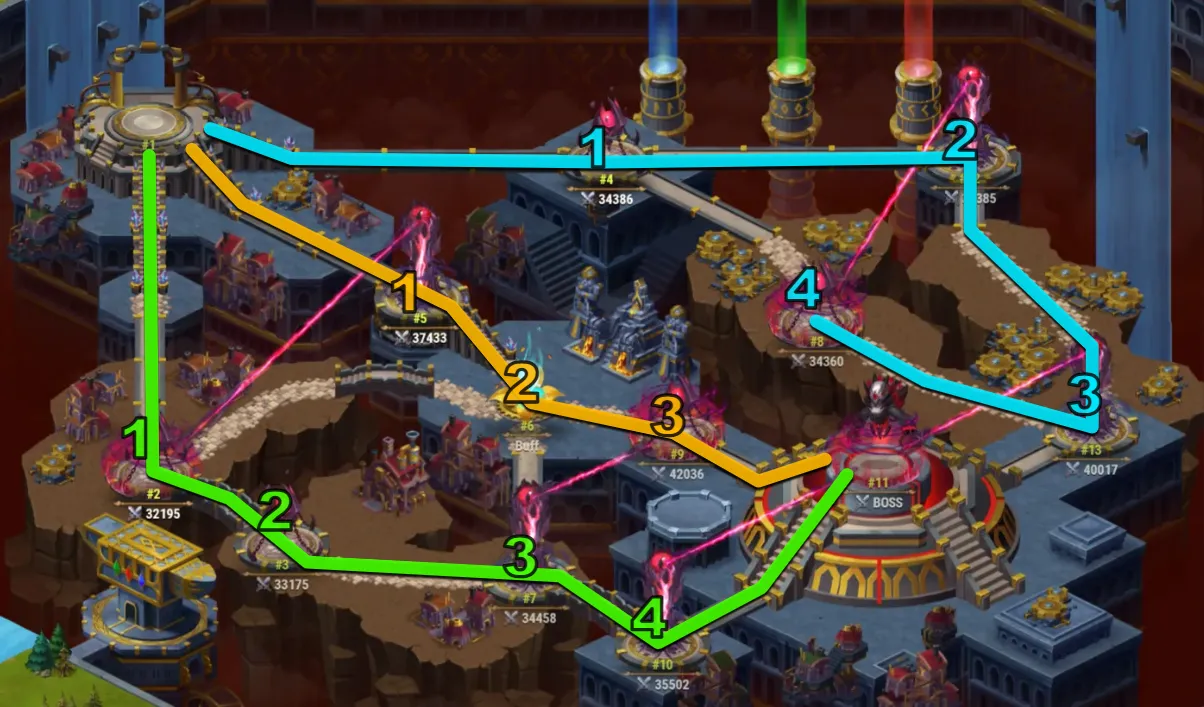
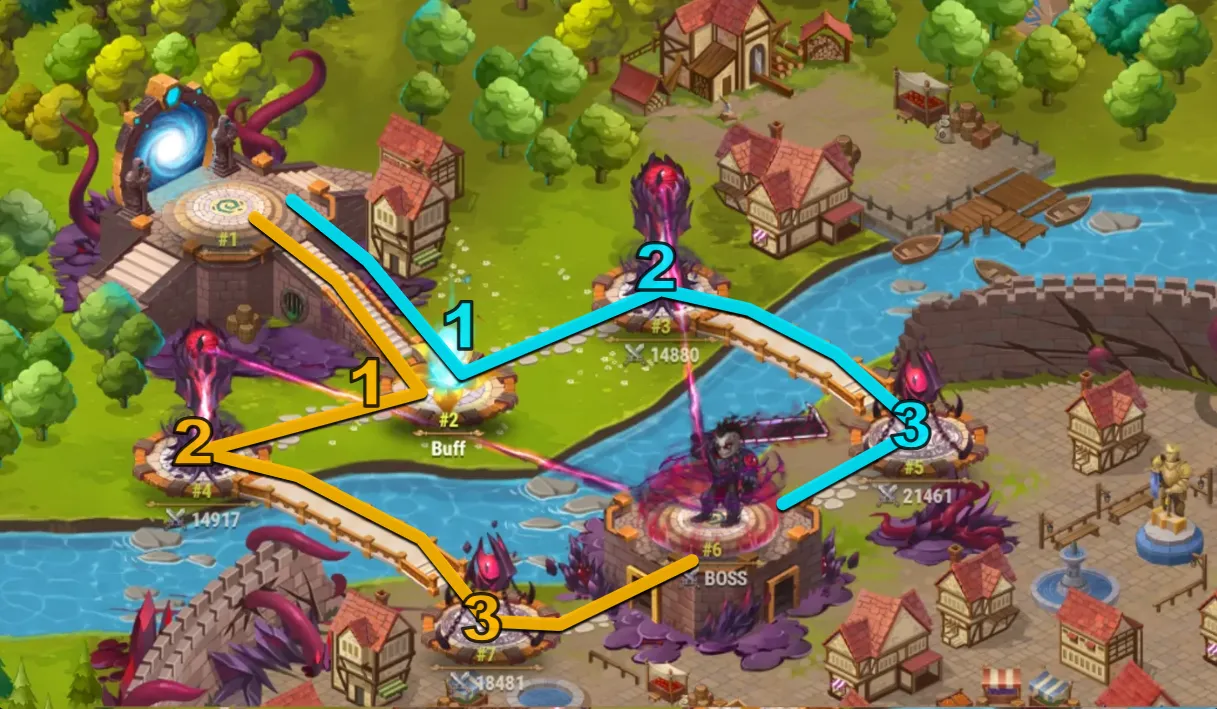
🗺️ Adventure Map 11 – Doomed Legacy
Adventure 11 marks the beginning of the high-tier maps in Hero Wars. With long paths, powerful minibosses, and altars that buff enemies if left untouched, it’s a true test of your team’s endurance. Proper lane assignment and fast clears are key to overcoming this legacy of chaos.
Highlights:
Great for mid-to-endgame players looking to farm.
Excellent source of Pet Summoning Eggs.
Strategic timing needed to unlock final boss safely.
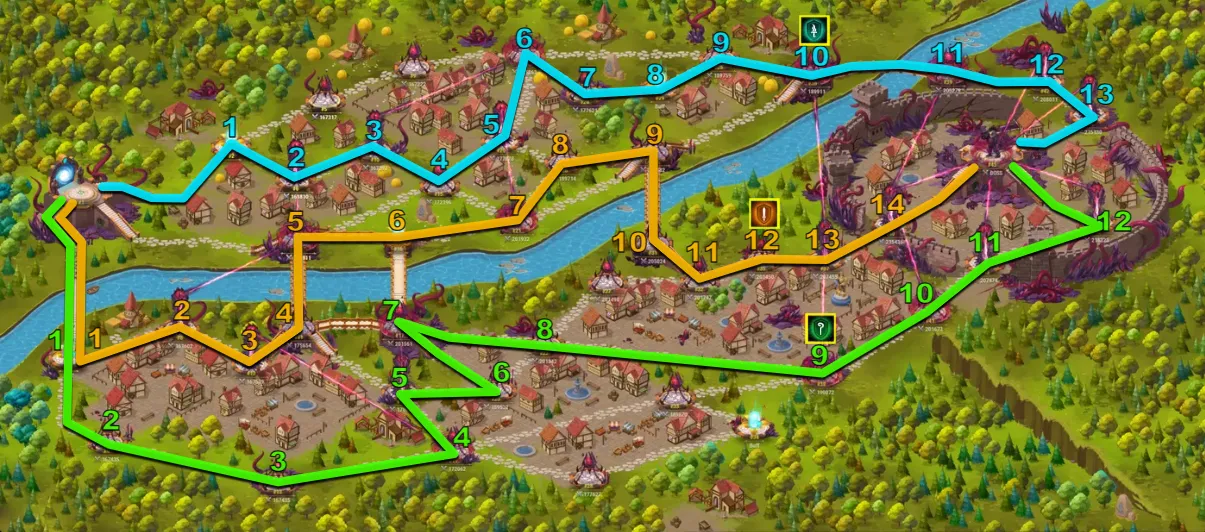
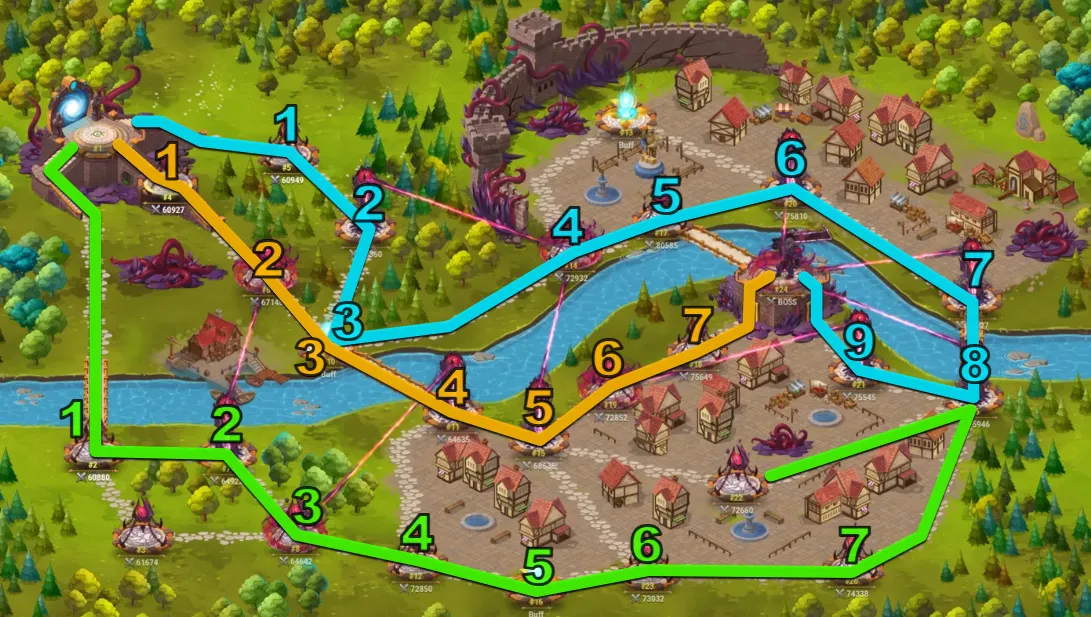
🗺️ Adventure Map 10 – Eternal Winter
Adventure 10 brings icy terrain, frozen obstacles, and enemies that debuff your team. Paths are longer and coordination is crucial to avoid doubling back. The cold doesn’t just look dangerous—it hits hard, especially if you’re not prepared for elemental resistance challenges.
Highlights:
Frozen nodes that require special timing to clear.
Moderate pet rewards with good XP.
Great for practicing group coordination under pressure.
🗺️ Adventure Map 9 – Ashen Dominion
Set in a scorched, volcanic land, Adventure 9 introduces lava hazards and powerful fire-based enemies. Players must plan carefully to avoid environmental traps and manage buff zones. Strong AoE teams perform well here.
Highlights:
Lava zones deal periodic damage—watch your timing.
Pet Potion and Chaos Particle rewards.
Ideal for testing elemental resistance and healing efficiency.
🗺️ Adventure Map 8 – Shifting Sands
In the desert realm of Adventure 8, shifting paths and sandstorm debuffs keep players guessing. Map awareness is critical as sandstorms can obscure enemies and even paths, requiring fast communication and adaptability.
Highlights:
Hidden altars and disappearing paths.
Great for Chaos Particles and Pet XP potions.
Demands flexible team compositions.
🗺️ Adventure Map 7 – Crimson Peak
Crimson Peak is where the challenge starts ramping up. Adventure 7 features enemies with heavy crowd control, narrow paths, and squad buffs that force creative team strategies. Players need to coordinate route timings to avoid wasting charges.
Highlights:
Narrow lanes encourage tight coordination.
Good source of Pet Soul Stones.
Introduces early group-based planning.
🗺️ Adventure Map 6 – Storm Ridge
High above the clouds, Adventure 6 is all about storm zones, lightning hazards, and slippery terrain. Mistimed moves can lead to team wipes. Coordination is essential to tackle the storm guardians guarding key altars.
Highlights:
Weather effects that buff or debuff nodes.
Pet rewards ramp up noticeably.
Lightning minibosses require fast burst damage teams.
🗺️ Adventure Map 5 – Twilight Path
Adventure 5 balances challenge and reward. With nightfall mechanics and vanishing nodes, players need to complete objectives before the light fades. This adventure introduces most core mechanics seen in higher maps.
Highlights:
Nodes vanish after a time—speed is key.
Nice balance of Pet Summoning Eggs and Chaos Particles.
First map where pet strategy starts becoming critical.
🗺️ Adventure Map 4 – Cursed Citadel
Adventure 4 brings cursed areas that sap energy and health. The map teaches timing and proper altar activation, pushing teams to balance offense and defense. Players must split to cover multiple power zones at once.
Highlights:
Cursed debuffs slow down progress.
Pet rewards include early-stage XP potions.
Good intro to energy management and status effects.
🗺️ Adventure Map 3 – Echoes of the Forest
A dense forest with winding paths, Adventure 3 introduces enemies that summon allies mid-battle and secret paths to hidden rewards. Teams will benefit from AoE heroes and good scouting strategies.
Highlights:
Hidden chests for extra pet resources.
Enemies use summoning—AoE attacks help.
Forest illusions add a twist to navigation.
🗺️ Adventure Map 2 – Fire Marsh
In Fire Marsh, teams deal with burning ground effects and aggressive enemy ambushes. Pet roles start to matter more as enemy strength ramps up. Efficient clearing is rewarded with a decent stash of pet materials.
Highlights:
Environmental damage areas.
First adventure with decent pet material drops.
Requires stronger heroes than Map 1.
🗺️ Adventure Map 1 – Siege of Strongford
The very first adventure introduces players to the world of Hero Wars co-op exploration. Simple enemies, basic altars, and straightforward lanes make it perfect for learning. Great for new players and guild coordination.