
Eva Mysterious Island Guide | Hero Wars Dominion Era


This Eva Mysterious Island Guide covers September’s map, where five towers, a full sweep of Season Chests, and a brand-new War Flag wait behind almost every explorer move you spend. Because the paths link together into one chain, the order you clear them in decides whether you finish the map efficiently or burn moves running each tower from scratch. Let’s break down every tower, every reward, and the smartest route on the island.
Eva Map: 5 Towers Overview
 50,000 Valor Coins ·
 1,500 Golden Threads ·
 100 Large Skin Stone Chests ·
 7 Pattern Chests ·
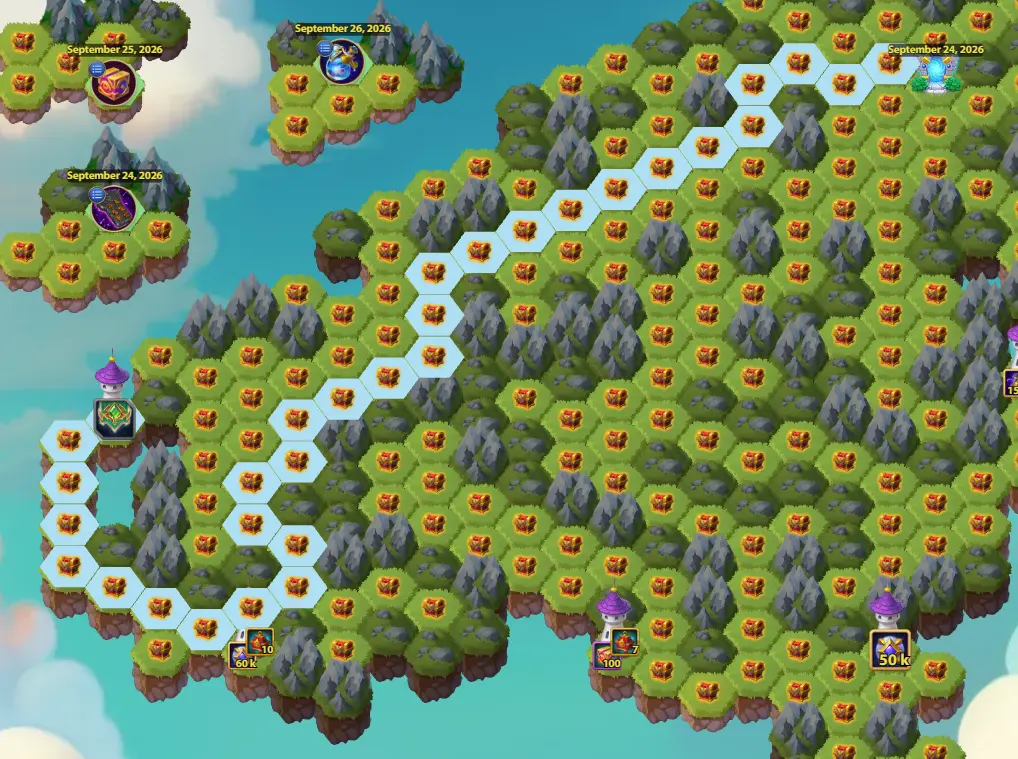
Every tower on the Eva map hands you something worth the walk, and Tower 5 adds a collectible you can’t get anywhere else this season. Here is a full breakdown of what each one offers and the cheapest way to reach it.
1. Tower 1
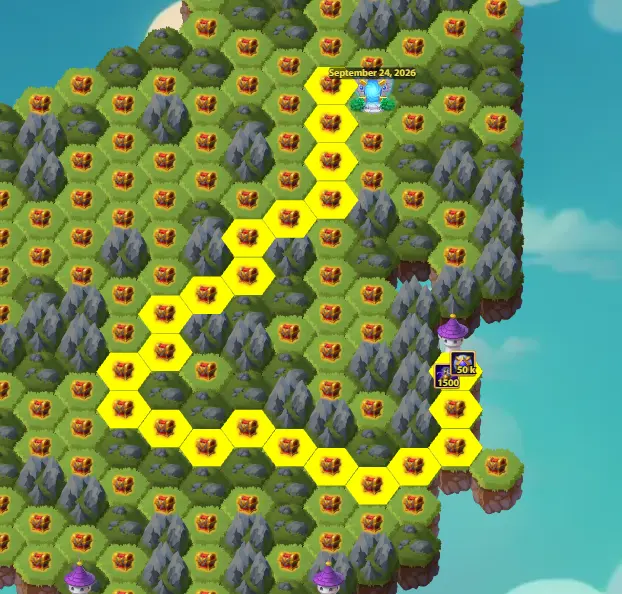
Main Rewards:
- 50,000 Valor Coins
- 1,500 Golden Threads
- 21 Season Chests
Tower 1 costs 22 explorer moves and has no shortcut of its own if you open with it. That is fine, because 22 is the joint-cheapest starting price on the island. Its real value is what it unlocks: once Tower 1 is down, Tower 2 drops to just 10 moves, and — more importantly — it is the key that opens the entire Tower 5 → Tower 4 branch. If you decide to take Tower 2 first instead, you can still fold Tower 1 back in for an extra 10 moves.
2. Tower 2
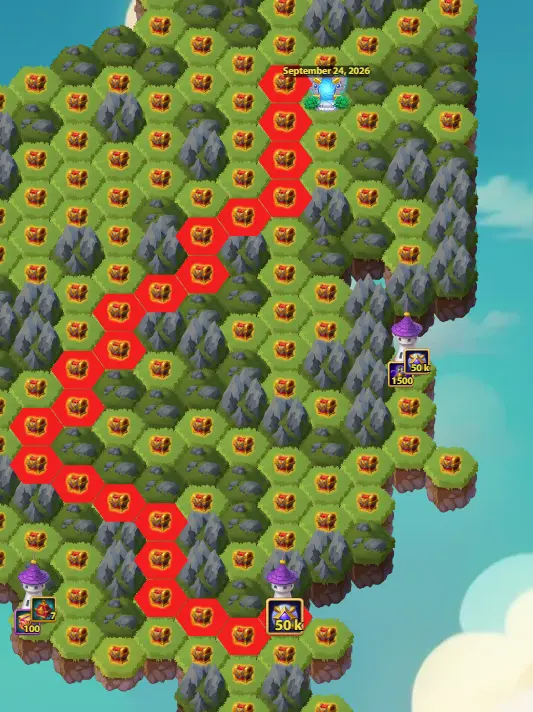
Main Rewards:
- 50,000 Valor Coins
- 21 Season Chests
Tower 2 mirrors Tower 1: 22 moves as a standalone opener, no shortcut of its own, and it drops to an extra 10 moves if you clear Tower 1 first. The reason Tower 2 matters so much is the tower right next to it — clearing Tower 2 opens Tower 3 for just 4 extra moves, the single biggest discount on the whole map. Whether you open with it or fold it in later, Tower 2 is the gateway to the cheapest Large Skin Stone Chest haul on the island.
3. Tower 3
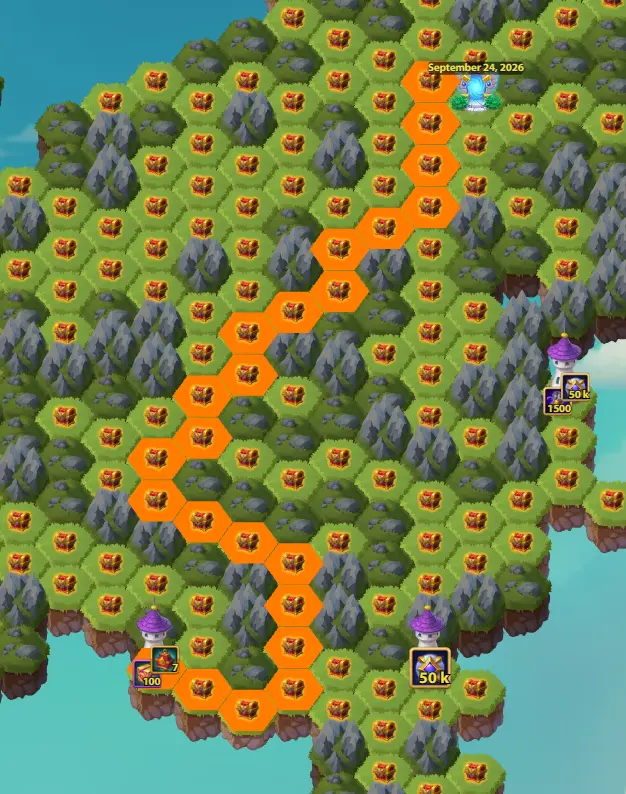
Main Rewards:
- 100 Large Skin Stone Chests
- 7 Chest of Patterns
- 22 Season Chests
This is where routing starts to pay off. Tower 3 is 23 moves from a cold start, but the approach angle changes everything. Come at it straight after Tower 2 and it costs a mere 4 extra moves. Come at it after Tower 1 instead — skipping Tower 2 — and the price jumps to 11 extra moves. With 100 Large Skin Stone Chests sitting at the end of it, the lesson is simple: always clear Tower 2 first, then walk straight into Tower 3.
4. Tower 4
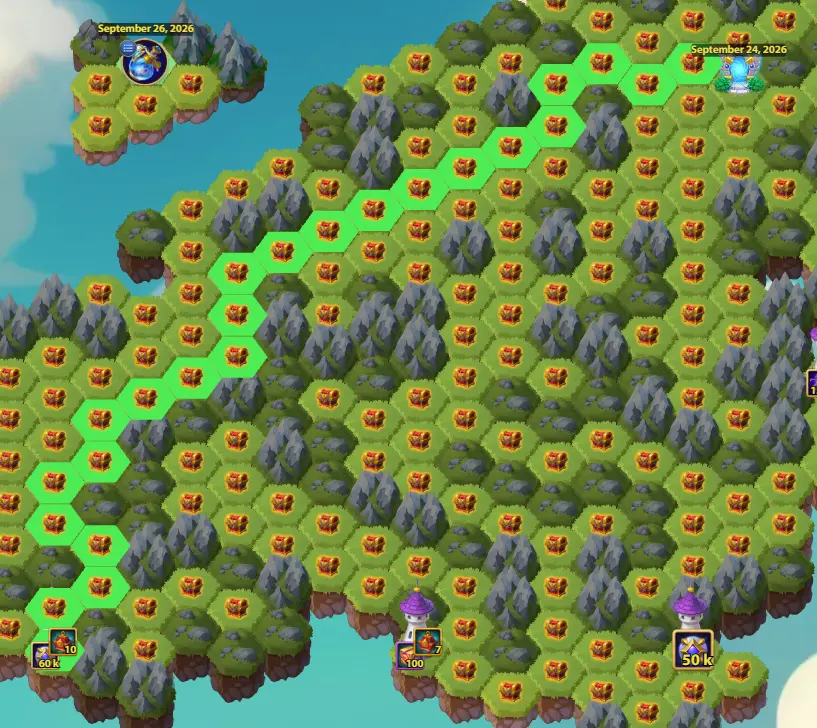
Main Rewards:
- 60,000 Valor Coins
- 10 Chest of Patterns
- 23 Season Chests
Tower 4 looks stubborn at first — 24 moves cold, with no obvious shortcut. Take Tower 1 beforehand and it opens for an extra 18 moves, which is a saving but still a big spend. The trick most players miss is the back door: clear Tower 5 first and Tower 4 falls for a single extra move. That 1-move pickup off the back of Tower 5 is the cheapest tower on the entire island, so never take Tower 4 the expensive way if Tower 5 is on your list.
5. Tower 5
Main Rewards:
- War Flag of False Immortality (new collectible)
Here comes the big one. Tower 5 is the premium stop, costing 30 explorer moves plus 3,000 emeralds to unlock — the only tower on the map that charges emeralds on top of moves. What you get is the War Flag of False Immortality, a brand-new flag you won’t want to miss. There is a smarter way in, though: clear Tower 1 first and Tower 5 drops to 25 moves, and for just 1 more move on top you sweep up Tower 4 as well. Those two towers back-to-back are the backbone of the optimal route.
Eva Mysterious Island Guide: Route Optimization
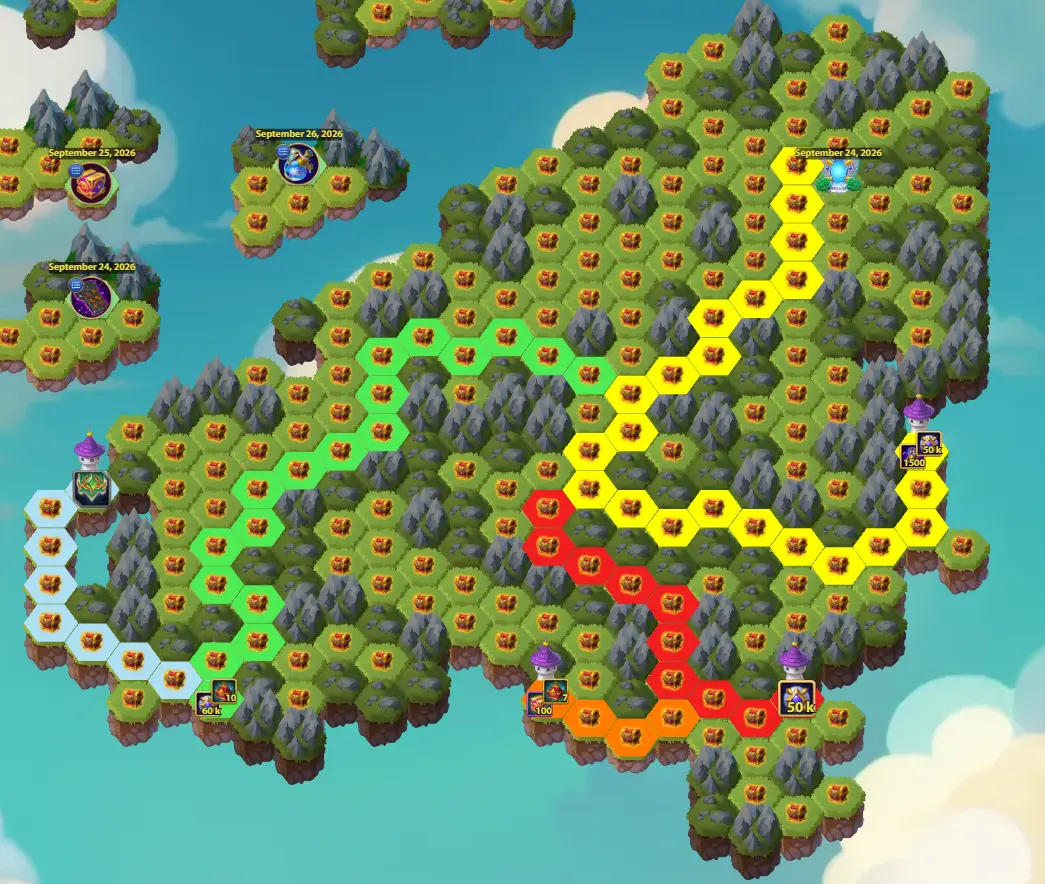
Routing is where this map is won. A full clear of all five towers costs 61 explorer moves + 3,000 emeralds when sequenced correctly, against a punishing 121 moves if you stubbornly run each tower from a cold start. That is 60 moves saved for nothing more than thinking ahead. The island works as a chain — Tower 1 and Tower 2 are twin openers that discount each other, Tower 2 feeds Tower 3, and Tower 1 opens the Tower 5 → Tower 4 branch.
Consequently, the rule is simple: you pay full price for your first tower, then collect discounts all the way down the chain. Open with Tower 1 or Tower 2 (both 22 moves), never lead with anything more expensive, then walk the chain in order and the map handles the rest.
Best Full-Clear Route
- Tower 1 → Tower 2 → Tower 3 → Tower 5 → Tower 4 = 22 + 10 + 4 + 25 + 1 = 62 on paper → 61 moves in practice* (+ 3,000 emeralds)
- Tower 2 → Tower 3 → Tower 1 → Tower 5 → Tower 4 = 22 + 4 + 10 + 25 + 1 = 62 on paper → 61 moves in practice* (+ 3,000 emeralds)
*Note on the math: add the individual shortcut prices above and you get 62, but the true full-clear cost is 61. That single-move difference is a shared corridor — two of the paths overlap on one stretch, so the game only charges you for it once when you link them on a full clear. It is the same overlap effect that trims your Season Chest count below the per-tower total (more on that below).
Running short on moves and unable to finish everything? Prioritise by value instead. Tower 2 → Tower 3 gets you 100 Large Skin Stone Chests for only 26 moves combined, Tower 4 delivers the fattest Valor Coin payout for a single move once Tower 5 is done, and Tower 5 itself is the only place to grab the new War Flag — but weigh that 3,000-emerald toll before you commit.
Eva Map: Full Strategy Visualization
Planning your route ahead of time is the most important step in this Eva Mysterious Island Guide, because explorer moves run out long before ambition does. We’ve put together this high-definition map so you can trace the exact path for every route.
Follow the map and you can see precisely where routes overlap and where they branch off. Pro Tip: Click the image to open the full high-resolution version in a new tab.
Click the map to enlarge • Optimized for the Eva Mysterious Island Guide
Total September Map Rewards
Clear all five towers in the right order and you walk away with a serious resource haul plus the new War Flag, for 61 explorer moves and 3,000 emeralds. Here is everything the Eva map hands you across a full clear, Season Chests included.
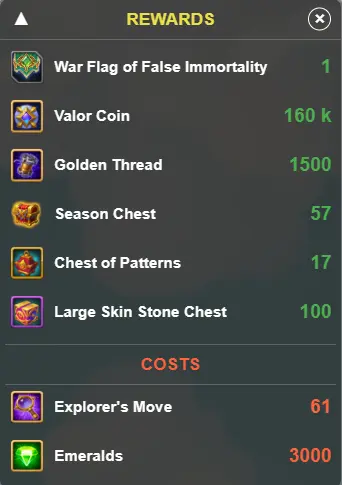
Those 57 Season Chests are the part most players overlook. Every explorer move you spend, apart from the move used to enter a tower, hands back a Season Chest. Notice that the per-tower chest counts add up to more than 57 — that is because those numbers (21 + 21 + 22 + 23 = 87) assume you run each path solo from the start. Link the paths together on a full clear and the shared corridors disappear, so your move count drops to 61 and your chest count settles at 57.
Ultimately, that trade is worth making every time. Fewer moves spent means more towers cleared inside the event window, and the tower prizes — the 100 Large Skin Stone Chests, the new War Flag — dwarf the handful of extra chests you would pick up wandering the long way around. Just factor in the 3,000-emerald toll for Tower 5, spend your daily explorer moves consistently, walk the chain in order, and the Eva map empties out with room to spare.
Recommended Hero Wars Guides
Join the Community
Which tower are you hitting first on the Eva Map? Drop your route in the comments! For real-time event updates and strategy talk, join our Hero Wars Olympus Discord:
Stay sharp, plan your route, and clear the Eva Map efficiently.